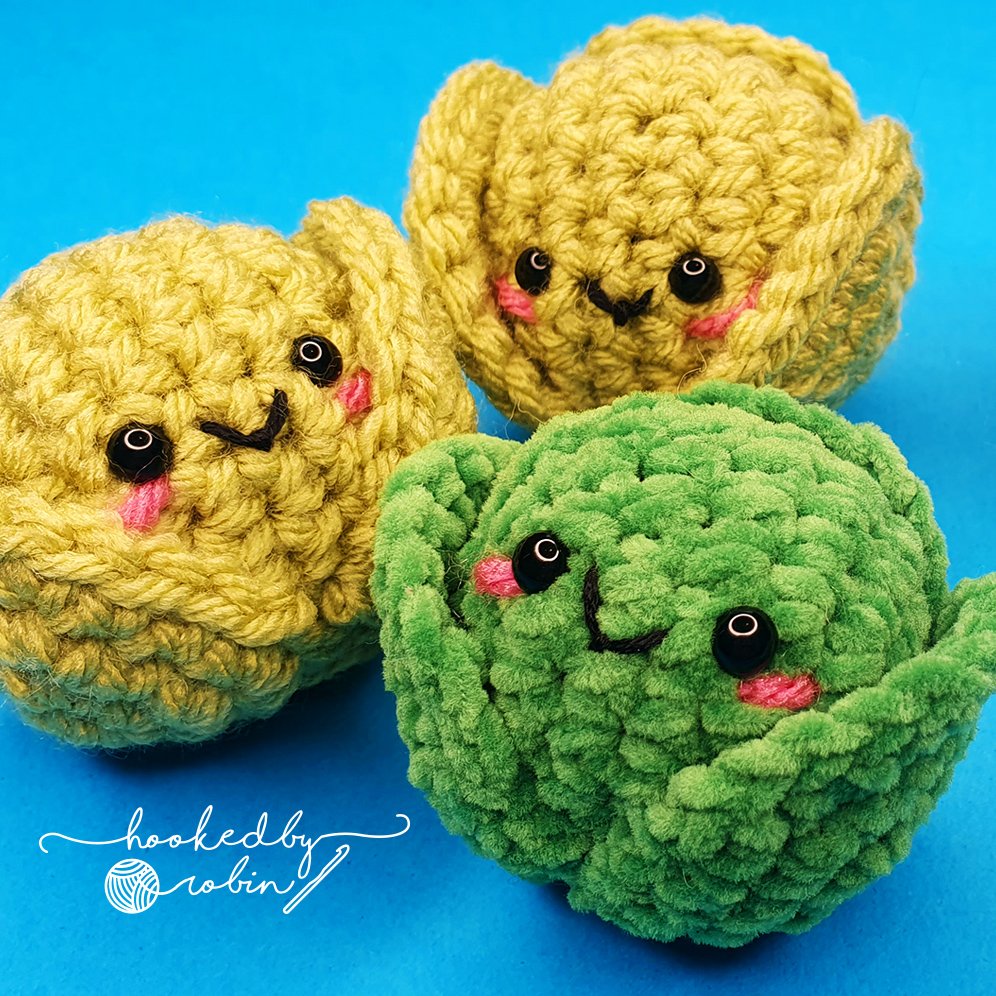
Crochet Brussel Sprout Amigurumi Pattern
Learn how to crochet a super cute kawaii amigurumi Brussel Sprout! Not everyone loves the vegetable but who could say no to a crochet version 😅

The full video tutorial shows you step by step how to crochet this cute sprout or keep scrolling for the written pattern below

Crochet Brussels Sprout Written Pattern
(USA Stitch Terms)
Materials needed:
Any green yarn and crochet hook size smaller than your chosen yarn recommends (I used Cygnet Chunky in Kiwi with a 4mm Hook and for the dark green sprout, Sirdar Happy Chenille in colour 0027)
A scrap of pink and black yarn (or black embroidery floss) for face details
Any size safety eyes (I used 6mm)
Stuffing
Stitch Marker
Needle
Scissors
Stitches used / Abbreviations:
MR - Magic ring / circle (you can substitute this for chain 2, work into 1st chain)
Sc (single crochet)
Inc (increase = 2sc in same stitch)
Dec (decrease = 1sc over 2 stitches) – I use the invisible decrease working in the front loops only - please see the video for further guidance
Repeat the pattern between the square brackets “[ ]” the number of times as shown by “X number”
The number in brackets “( )” at the end of each round is your total stitches that you will have worked in that round
Unless specifically instructed, work in spirals; do not join at the end of your rounds.
Sprout Body
1. Magic ring, 6sc (6)
2. [inc] x6 (12)
3. [1sc, inc] x6 (18)
4. sc in each stitch around (18)
5. sc in each stitch around (18)
6. sc in each stitch around (18)
7. sc in each stitch around (18)
8. [sc, invisible dec] x6 (12)
Turn sprout sideways and place first eye between rows 4 & 5. Then add second eye between rows 7 & 8.
Add cheek blush with pink yarn and embroider mouth in between the eyes on the same level. Please see video
Stuff the body
9. [invisible dec] x 6 (6)
Add any additional stuffing at this point.
Chain 1, cut yarn leaving long end for weaving in. Thread needle and run through the outside loops of the last 6 stitches, pull tight to cinch hole closed then weave in.
Sprout Leaves - MAKE 3
1. Magic ring, 6sc (6)
2. [inc] x6 (12)
3. [1sc, inc] x6 (18)
4. [2sc, inc] x6 (24)
Chain 1, cut yarn leaving long end for sewing to the body.
Sprout Assembly
For full tutorial on the assembly please see the video.
Weave in the ends from your magic ring starts - attach leaves with the right side facing outwards.
In brief: Pin leaves into place around the sprout - starting with the back leaf first. Line up bottom of leaf with the base of the sprout with the face facing forwards. Sew approimately 3 - 5 stitches in a straight line then stitch up the sides to suit how you want your back leaf to look.
Pin on the side leaves, lining up the bottom of the leaves roughly in line with the mouth at the base of the sprout. This will form a bottom so your sprout can sit unaided. Sew approimately 3 - 5 stitches in a straight line then stitch up the sides to suit how you want your side leaves to look.
Once you are happy with your leaves, weave in the ends and your sprout is finished!
If you spot any errors in the written pattern please do let me know.
Happy Crocheting!
Robin